Notifyre’s secure online platform makes it easy to send faxes directly from your web browser. No fax machine required. Simply log in to your Notifyre dashboard on your computer, tablet or smartphone and navigate to Send, then Fax.
Before sending a fax, you’ll need to complete two quick steps:
-
Verify your phone number linked to your Notifyre account.
-
Top up your account with wallet funds to cover the cost of your fax.
Once these steps are complete, you can upload your documents, enter the recipient’s fax number, and send your fax with just a few clicks.
To verify your phone number:
- Login to the Notifyre Dashboard
- Select the drop-down menu under your Account name (top right corner)
- Select Profile
- Select Verify Number
- A verification code will be sent to your nominated phone number.
- Enter the verification code into the field and click Verify
- A verified badge
 will be visible next to your phone number once it has been verified
How to send a fax online:
- Login to the Notifyre Dashboard
- Select Send on the left navigation
- Select Fax from the dropdown menu
- In the From Fax Number field: Select from Notifyre System Number or My Fax Numbers
- In the To Fax Number field: Enter the destination fax number, contact or contact group name and click + or select Enter or Tab on your keyboard to add. You have the option to add multiple fax numbers, contacts or contact groups.
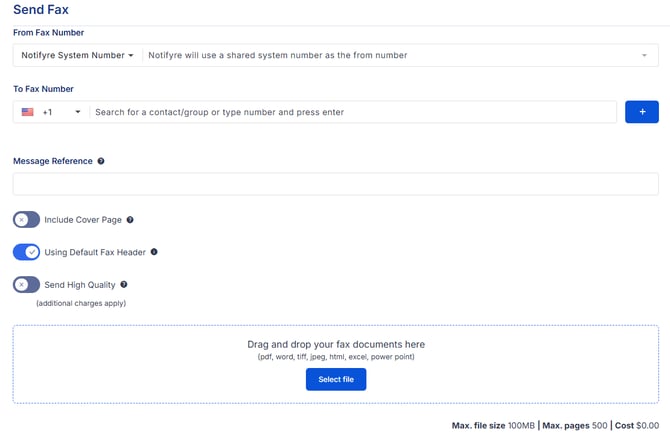
- Enter the Fax Header (maximum 21 characters). If no Fax Header is set the system will use the default fax header if it has been enabled in fax settings.
- To attach a file, you can drag and drop files directly from your computer or select Select File to upload your document.
- Click Send

Additional options are available when sending a fax online using Notifyre's online fax service. These include:
- Reference: Enter text to identify the fax message in your Activity Reports (100 characters limit). If this field is left blank a unique ID will be created for tracking purposes.
- Include Cover Page: You have the option to send a fax with a cover page. This is switched OFF by default. To turn this ON select the toggle so it turns blue. Then select the cover page provided or create a custom cover page.
- Send High Quality: All faxes are sent in Standard Quality (200 x 98 DPI) by default. To enable High Quality (200 x 196 DPI), toggle this setting ON (blue toggle turns high resolution ‘ON’. See: Managing fax sending quality.
- Re-Arrange Files: You can re-arrange the order of the attached fax pages by dragging and dropping files up or down. The attachment displayed at the top will be faxed first, followed by any additional page/s within additional attached files (in the order attached).
- Schedule a Fax: You can schedule a fax to send at a specific date and time. To schedule a fax, simply select the toggle ON so it turns blue (toggled OFF by default) and select the date and time by clicking
 . Scheduled fax sends can be viewed and cancelled via Fax Activity.